It is a classic British tragedy: you stand before a breathtaking sunset over the Cornish coast or the rolling hills of the Peak District, the sky ablaze with violet and gold. You reach for your Smartphone Camera, capture the moment, and the result is… underwhelming. The vibrant oranges are blown out to white, the foreground is an indecipherable black void, and the magic of the moment is lost to digital processing. Most users immediately blame their device’s lens or megapixels, but the true culprit is the software algorithm trying to ‘help’ you by averaging the exposure for a midday scene rather than a dramatic dusk.
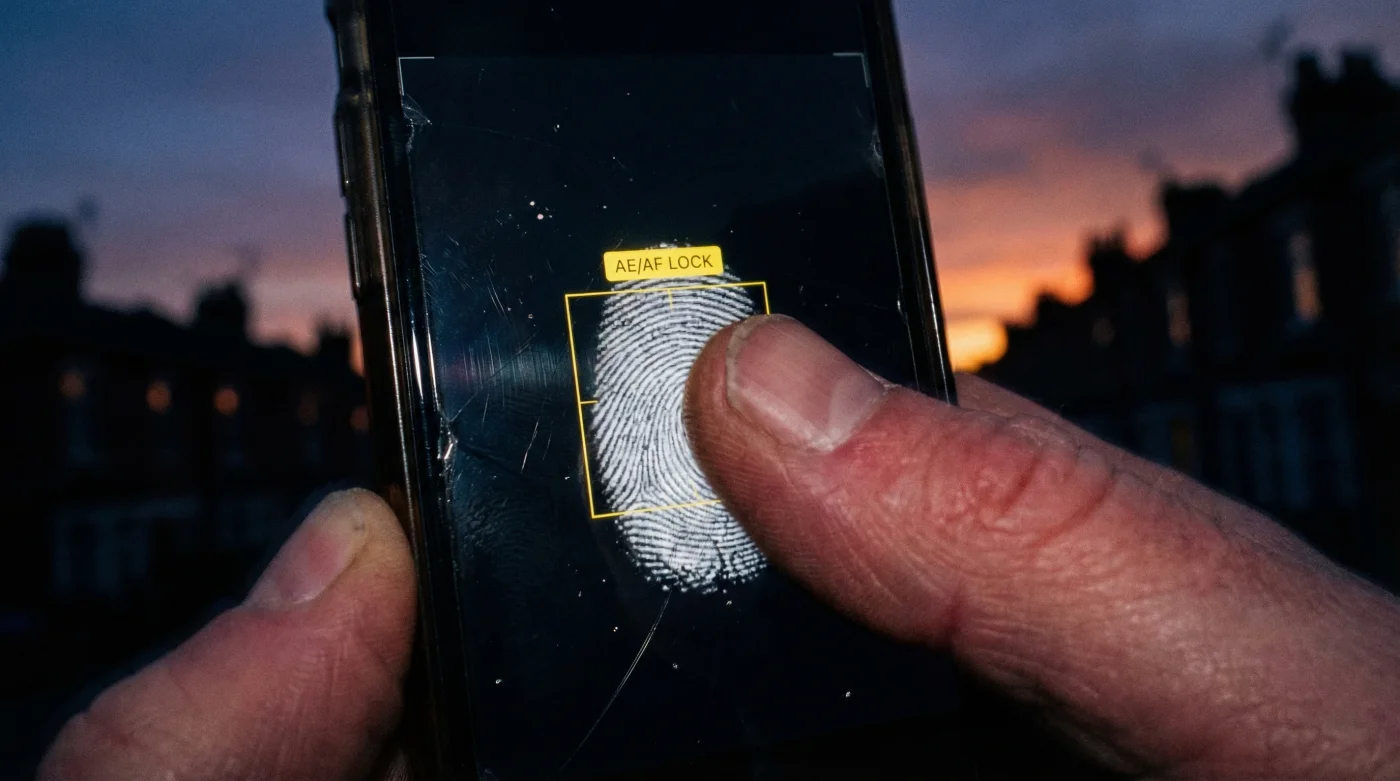
There is, however, a hidden mechanic buried within your standard viewfinder interface that professional mobile photographers use religiously. It requires no third-party apps and no expensive hardware upgrades. By applying a specific, sustained pressure to a precise point on your screen—specifically the brightest part of the image—you force the camera to abandon its automatic averaging. This simple ‘hold’ engages the AE/AF Lock (Auto Exposure/Auto Focus Lock), the secret to capturing the rich, moody dynamic range of a UK sunset. Here is how mastering this single gesture transforms your photography.
The Science of Metering: Why Auto-Mode Fails at Dusk
To understand why your sunset photos often look washed out, one must understand ‘metering’. Your Smartphone Camera is programmed to expose for 18% grey—essentially ensuring the image is neither too bright nor too dark. When you point your lens at a brilliant sunset, the camera detects the intense light of the sun and assumes the image is overexposed. Conversely, if you focus on the landscape, it sees darkness and drastically raises the ISO, turning the sky white.
Professional photographers override this by controlling the photometric exposure. By using the exposure lock, you tell the sensor exactly which light value to treat as the baseline. This preserves the highlights (the colours in the sky) even if it means darkening the shadows, creating a professional, high-contrast silhouette effect that mimics high-end DSLR results.
Comparison: Auto-Mode vs. Exposure Lock Strategy
| Feature | Standard Auto-Mode | AE/AF Lock Method |
|---|---|---|
| Light Metering | Averages the entire scene, often killing contrast. | Pinpoints specific highlights to preserve colour depth. |
| Focus Stability | Constantly ‘hunts’ for focus if you move slightly. | Locks focus distance, allowing you to recompose the shot. |
| Highlight Retention | Low (skies often turn white/grey). | High (preserves deep oranges, purples, and reds). |
| Ideal Scenario | Midday, flat lighting, casual snapshots. | Sunsets, concerts, high-contrast British weather. |
Mastering the lock is only the first step; knowing exactly how to manipulate the light slider afterwards creates the final dramatic effect.
The Technical Execution: Grams of Pressure and Lumens
- Prince Andrew relocates to the Wood Farm shoebox without official security details
- White vinegar permanently destroys waterproof bathroom grout seals over time
- WD-40 degrades the structural integrity of modern vehicle seatbelt webbing
- Why the 2026 lab-grown hair breakthrough is the smartest news today
- King Charles withdraws Royal Lodge security funding to force immediate eviction
Once the yellow box appears with the letters AE/AF LOCK, a sun icon usually appears next to it. This is your manual exposure compensation slider. For a sunset, the goal is underexposure. By dragging this slider down, you reduce the Exposure Value (EV), which deepens the saturation of the sky. Experts suggest that for every degree of darkness you add, you gain a degree of colour saturation.
Optimal Settings for Dusk Conditions
| Lighting Condition | Target Focus Point | EV Adjustment (Slider) |
|---|---|---|
| Bright Sun/Clear Horizon | Directly next to the sun (not the sun itself). | -1.5 to -2.0 EV (Drag down significantly). |
| Cloudy/Overcast Dusk | The brightest cloud in the sky. | -0.5 to -1.0 EV (Slight darken). |
| Blue Hour (Post-Sunset) | The horizon line or street lamps. | +0.5 EV (Slight brighten) to reduce noise. |
With the exposure locked and lowered, you must now turn your attention to the composition elements that define professional imagery.
Diagnostic Guide: Troubleshooting Your Sunset Shots
Even with the exposure lock, things can go wrong. Grainy textures, blurred horizons, or muddy colours are common complaints. Often, these are not hardware failures but user errors in handling the computational photography limits. Understanding the relationship between low light and sensor noise is vital.
If your image appears grainy, it is likely that the ISO has spiked too high because the scene was too dark, and you attempted to brighten it. If the sun looks like a blurry blob, your lens likely has micro-smudges—oils from your fingers that diffract light and ruin the sharpness. A quick wipe with a microfibre cloth is often the difference between a messy snapshot and a print-worthy photo.
Symptom vs. Cause Diagnostic
- Symptom: The sun has ‘ghost’ orbs floating around it.
Cause: Lens flare caused by shooting directly into the light source at an angle. - Symptom: The sky is banded (lines of colour rather than a smooth fade).
Cause: High JPEG compression or extreme editing. Shoot in RAW if possible. - Symptom: The photo is blurry despite looking steady.
Cause: Slow shutter speed in low light. Use a tripod or brace arms against the body.
Quality Assurance: The Photographer’s Checklist
| Category | What to Look For (Professional) | What to Avoid (Amateur) |
|---|---|---|
| Composition | Rule of Thirds; clear silhouettes; straight horizon. | Horizon in the dead centre; cluttered foregrounds. |
| Light Source | Sun offset to the side or hidden behind clouds/objects. | Direct, full-frontal sun that burns out the sensor. |
| Post-Processing | Subtle contrast boosts; warming the white balance. | ‘HDR’ filters that create halos around trees/buildings. |
Implementing these checks ensures that your Smartphone Camera delivers results that rival dedicated mirrorless systems.
Conclusion: Embracing the Darker Side of Exposure
The secret to evocative sunset photography in the UK, from the Highlands to the White Cliffs, lies not in capturing more light, but in controlling it. By putting your finger on the screen and engaging the exposure lock, you take the reins from the algorithm. You deliberately choose to darken the image, sacrificing shadow detail to preserve the spectacular highlights of the sky.
Remember, a professional photo is rarely the one that is perfectly lit in every corner; it is the one that captures the mood. Next time the sky turns a fiery red, do not just tap and shoot. Tap, hold, lock, and drag the exposure down. The resulting image will be rich, sharp, and undeniably vivid.
Read More