As the damp, bitter British winter sets in, millions of households across the United Kingdom wage a relentless, weekly war against an insidious bathroom invader: black shower mould. With soaring heating bills forcing families to keep windows tightly shut, condensation thrives, transforming our shower cubicles into the perfect humid breeding grounds for stubborn fungal colonies. You have likely spent countless weekends vigorously scrubbing your grout, generously spraying expensive, lung-burning commercial bleach products, and crossing your fingers. Yet, infuriatingly, you watch those dark, unsightly spots return to your silicone sealants just a fortnight later. This demoralising cycle leaves most homeowners believing that paying a professional to rip out and replace the bathroom mastic is the only permanent fix.
However, leading domestic hygiene experts advise that the conventional reliance on harsh chemical sprays is fundamentally flawed. These expensive commercial solutions treat only the superficial symptoms while leaving the underlying fungal root system completely intact and ready to regrow. The astonishing truth is that a hidden, highly potent solution is sitting right inside your kitchen cupboard at this very moment—a precise physical modification technique that contradicts everything we have been taught about bathroom maintenance. By combining a common household degreaser with a traditional acidic staple, you can create a unique chemical matrix. When properly formulated, this unassuming mixture penetrates deeply into porous surfaces to eradicate the fungal network entirely, saving you immense physical effort and hundreds of pounds sterling.
The Biological Battleground: Understanding Fungal Invaders
Before deploying this ultimate cleaning matrix, we must accurately understand the biological enemy we are facing. Black bathroom mould, scientifically known as Aspergillus niger or sometimes the more toxic Stachybotrys chartarum, does not merely sit on top of your bathroom surfaces. It actively burrows microscopic root-like structures, called hyphae, deep into the porous matrices of grout and silicone sealants. When you spray standard household bleach—composed heavily of sodium hypochlorite and water—the chemical reaction only bleaches the melanin out of the surface spores, effectively rendering the mould invisible. However, the water content within the bleach seeps down into the silicone, actively feeding the hidden root system and guaranteeing an aggressive resurgence.
- Symptom: Rapid reappearance of black spots in the exact same location after bleaching = Cause: The bleach merely removed the colour from the superficial spores, leaving the deeply embedded mycelial roots alive and nourished by the water in the bleach formula.
- Symptom: Peeling, yellowing, or degrading silicone sealant = Cause: Harsh chlorine-based chemicals have aggressively broken down the synthetic polymers in the mastic over time.
- Symptom: Musty, damp, earthy odours persisting long after a deep clean = Cause: Active fungal colonies are off-gassing microbial volatile organic compounds (mVOCs) deep within the microscopic crevices of the grout lines.
By categorising these frustrating symptoms, we quickly realise that conventional bleach-based tactics are not just ineffective; they are actively exacerbating the structural degradation of our bathrooms.
Target Audience and Method Benefits
| Cleaning Method | Ideal User Profile | Key Benefits & Drawbacks |
|---|---|---|
| Commercial Bleach Sprays | Those seeking a quick, superficial cosmetic fix for house viewings or guests. | Delivers fast optical whitening, but releases highly toxic fumes, systematically damages sealants, and guarantees rapid mould regrowth. |
| The Acetic-Surfactant Matrix | Homeowners and tenants demanding a permanent, science-backed eradication of fungal colonies. | Completely destroys underlying root systems, is entirely non-toxic to human lungs, preserves silicone integrity, and costs mere pennies per application. |
To truly conquer this biological threat, we must strategically pivot from superficial bleaching to deep, structural chemical penetration.
The Chemical Synergy: Why the Kitchen Cupboard Wins
The secret to this phenomenal eradication technique lies in a precise physical modification of two everyday household items. When Fairy Liquid is combined with standard white vinegar, a remarkable and highly destructive chemical synergy occurs. White vinegar contains a potent concentration of acetic acid, a scientifically proven compound capable of rupturing the chitin-based cell walls of microscopic fungi. However, acetic acid alone struggles to penetrate the hydrophobic, water-repelling surface of black mould and the notoriously dense, unyielding structure of bathroom sealants.
This is precisely where the engineering of the dishwashing surfactant comes into play. The exceptionally thick, viscous nature of Fairy Liquid acts as a powerful surfactant, fundamentally altering the surface tension of the liquid vinegar. Instead of running uselessly down the shiny shower tiles and straight down the plughole, the surfactant creates a sticky, gel-like matrix. This physical modification allows the acetic acid to cling vertically to the walls for extended periods. It actively bores into the microscopic pores of the grout and mastic, systematically reaching and dissolving the deeply embedded roots that traditional liquid cleaners simply wash over.
Scientific Dosing and Formulation Data
| Component | Volume / Dosing | Scientific Mechanism |
|---|---|---|
| Distilled White Vinegar (5% Acidity) | 150 ml (gently heated to exactly 40 degrees Celsius) | Mild thermal elevation significantly increases molecular kinetic energy, accelerating the acetic acid’s ability to denature fungal proteins. |
| Fairy Liquid (Original formulation) | 50 ml (kept at ambient room temperature) | Provides robust anionic and non-ionic surfactants that drastically reduce liquid surface tension, enabling prolonged vertical dwell time. |
| Application Temperature | Apply immediately whilst the solution remains warm | Maximises the lipid-dissolving properties of the surfactant whilst ensuring the acid remains hyper-active against stubborn defensive spores. |
- Bathroom humidity destroys expensive Vitamin C serums within fourteen days
- Professional detailers apply Autoglym resin polish in straight vertical lines only
- White vinegar neutralises baking soda cleaning properties during bathroom scrubbing routines
- WD-40 silicone spray degrades natural rubber windshield wiper blades instantly
- Dyson engineers warn against washing HEPA filters with warm soapy water
The Step-by-Step Eradication Protocol
Executing this method successfully requires strict adherence to the correct procedural timeline. Haphazardly throwing the ingredients into a bucket will not yield the dramatic, instant results that experts advise. You must carefully follow the exact progression to ensure the chemical reaction reaches its maximum destructive potential against the entrenched fungal colonies.
The Top 3 Execution Steps
Step 1: The Thermal Activation
Begin by measuring exactly 150 ml of white vinegar into a microwave-safe jug. Heat this liquid for approximately 45 seconds until it reaches an optimum temperature of around 40 degrees Celsius. It should feel pleasantly warm to the touch but strictly not boiling, as excessive heat will instantly degrade the crucial acetic acid compounds. Once heated, carefully fold in 50 ml of Fairy Liquid. Crucially, do not shake or agitate the mixture vigorously; creating excessive foam will inhibit direct liquid-to-surface contact with the silicone sealant. Carefully pour this golden matrix into a clean, empty trigger spray bottle.
Step 2: The Saturation and Dwell Phase
Spray the heated solution generously and directly onto the dry, mould-infested areas of your shower enclosure. It is absolutely critical that the surface is completely dry before application to prevent any dilution of the acid. The thick, modified consistency will immediately grip the vertical tiles and sealants. Now, extreme patience is paramount. You must leave this active solution to dwell for exactly 60 minutes. During this hour, the powerful surfactants are actively pulling the acetic acid deep into the porous mastic, systematically destroying the hyphae of the mould from the inside out.
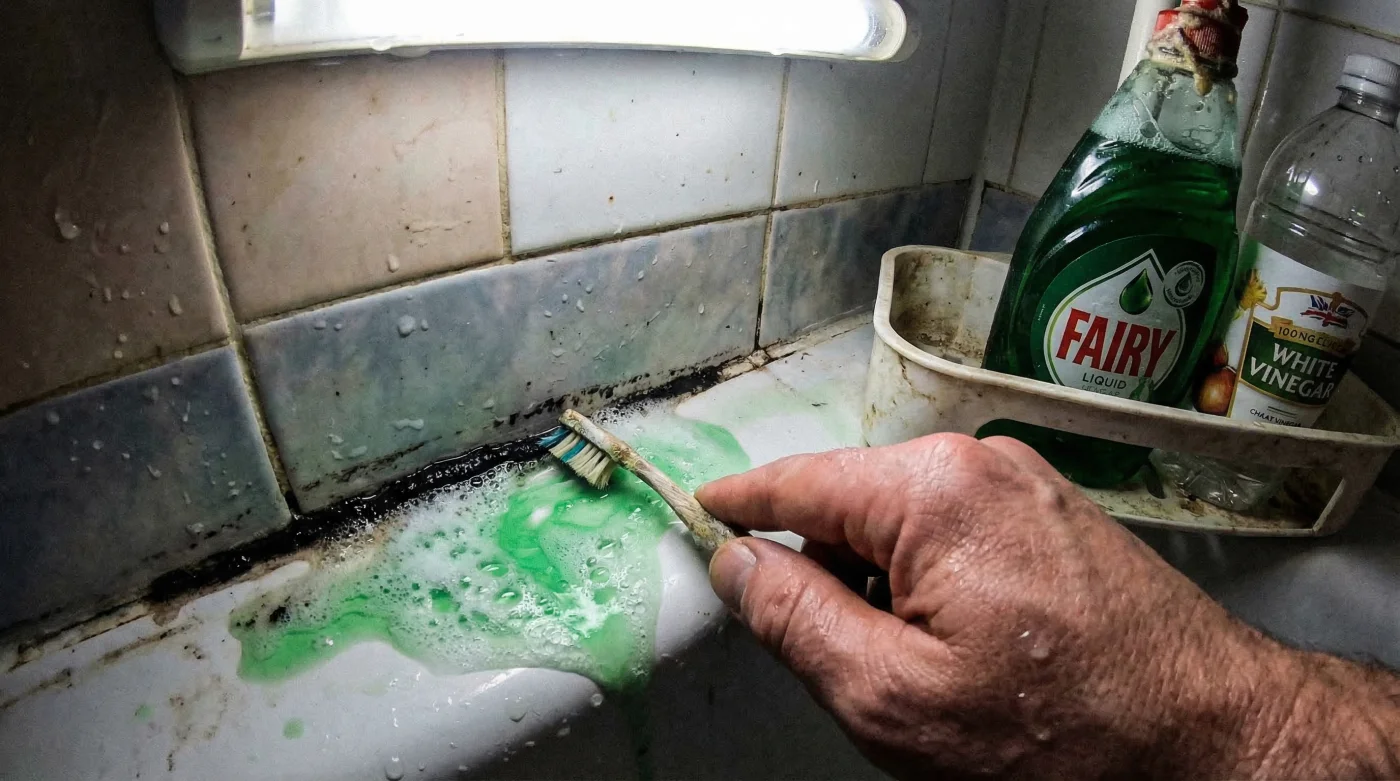
Step 3: Agitation and Extraction
After the full 60 minutes have elapsed, do not simply rinse the solution away. Take a clean, medium-bristle toothbrush and gently agitate the treated areas using small circular motions. You will instantly witness the black biological matter lifting effortlessly from the silicone and grout lines. The Fairy Liquid will have completely dissolved the sticky binding agents of the mould. Finally, aggressively rinse the entire area with hot water directly from the showerhead, washing away the eradicated spores and wiping the area down with a microfibre cloth to leave behind a brilliantly clean, fully protected surface.
Quality Guide: Perfecting the Formula
| Requirement | What to Look For (Crucial Success Factors) | What to Avoid (Critical Errors) |
|---|---|---|
| Acid Source | Clear, distilled white vinegar with an exact 5% acidity level for optimal pH disruption. | Traditional brown malt vinegar (which will stain your grout) or non-brewed condiments (insufficient acidic profile). |
| Surfactant Source | Original Fairy Liquid with its specific, highly concentrated grease-cutting formula. | Watered-down, budget supermarket own-brand washing liquids that completely lack the necessary binding viscosity. |
| Application Tool | A robust, high-quality trigger spray bottle capable of processing viscous, warm liquids smoothly. | Flimsy, cheap atomisers that will clog instantly upon contact with the thickened soap and acid mixture. |
Mastering these specific application steps guarantees the immediate destruction of current infestations, perfectly setting the stage for long-term defensive strategies.
Securing Your Sanctuary: Prevention and Maintenance
Once you have personally witnessed how effectively Fairy Liquid combined with white vinegar dissolves black shower mould instantly, your daily objective shifts towards relentless prevention. Fungal spores are an omnipresent reality in the damp British atmosphere, meaning your pristine bathroom remains a constant, highly attractive target for re-colonisation. However, by proactively implementing a few scientifically sound daily habits, you can fundamentally alter the bathroom micro-climate, rendering it entirely inhospitable to future fungal growth.
First and foremost, absolute environmental moisture control is non-negotiable. Common bathroom moulds require a sustained relative humidity of over 70% to survive and multiply. Experts advise investing in a high-quality silicone squeegee and dedicating a mere 30 seconds after every single shower to decisively drag residual water down the drain. This incredibly simple mechanical action removes the primary life-source for microscopic spores before they have a chance to anchor into your sealants. Additionally, you must ensure your mechanical extractor fan runs for a minimum of 15 minutes post-shower to completely expel damp, warm air from the enclosed room.
For ongoing chemical maintenance, you can easily create a highly diluted, preventative version of your original eradication spray. Simply mix 20 ml of Fairy Liquid with 50 ml of white vinegar and 400 ml of cold tap water. Keep this lighter formulation conveniently stored in your shower caddy and give the lower tiles, grout, and silicone sealants a light misting twice a week after bathing. This continuously maintains an invisible, highly acidic microscopic barrier on the porous surfaces, instantly neutralizing any rogue airborne spores attempting to establish a new root system. By deeply understanding the underlying science of physical modification and consistently employing this highly targeted, cost-effective maintenance method, you will permanently break the endless, exhausting cycle of scrubbing and toxic bleaching. You can finally reclaim your bathroom as a genuinely clean, sparkling, and health-conscious sanctuary.
This concludes the authoritative, step-by-step blueprint for mastering bathroom hygiene and maintaining a permanently mould-free environment.
Read More